This is one of the most risky projects I have undertaken to date - especially since violin making is considered by most to be the 'pinnacle of woodworking'.
For those who don't know, the viola is a bowed string instrument pitched in between the violin and the cello, in terms of both sound and size. It forms the 'alto' voice of the orchestra but is rarely heard as a solo instrument due to it being able to 'blend' in so well with the rest of the orchestra.
This is a 15.5" Chinese factory viola from Yita Music that cost about $350 SGD, it could not project well (i.e. it was soft) so I upgraded to another instrument after a year of playing it in the SUTD Chamber Ensemble.
 |
| First Impressions |
The tone and projection of a bowed string instrument is governed by a myriad of factors: the quality of the wood used, the shape, arching and thickness of the front and back plate, the thickness of the ribs, and of course, the final setup of the instrument.
The viola I had was heavy (too thick) and that was probably one of the reasons why it was not projecting well. The solution to this is to regraduate the instrument - which involves taking it apart and scraping off the right amount of wood in the right places:
1: Taking the instrument apart:
All bowed string instruments are put together using hide/animal glue. This glue is strong, but brittle and water-soluble. Although these traits are usually not very desirable, hide glue is used to construct string instruments as its properties allow the instrument to be taken apart for the occasional repair job. In addition, the glue joint formed is usually weaker than the wood used, which means that it would break in deference to the wood should the instrument experience excess pressure.

Taking apart a new instrument however, is not that simple as glue joint is still relatively strong. I spent quite a bit of time trying to break it without damaging the instrument. Once the glue joint is broken in one location, a chisel or a butter knife can be slid slowly around the instrument and the rest of the glue joint would yield to the pressure.
However, special caution must be taken when prying the top, bottom and four sides open. There are corner blocks in these locations and the glue joint is much stronger there. I managed to get the top of my first instrument open with one crack near the top (a good result by my luthier's standards; he expected three cracks).
2. Regraduating the Instrument:
 |
| The top plate of the viola shown together with my partners in crime: a 10mm plane, a penknife blade (snapped down to size) and a sharpened palette knife, which acts like a scraper. |
Since this is a strad-style viola, I pulled off measurements made on the famed 'Gibson' Stradivarius from the internet:
http://www.roger-hargrave.de/PDF/Artikel/Strad/Artikel_1986_09_Stradivari_Gibson_PDF.pdf
In theory, IF i manage to get the thickness of the front and back plates down the the specifications, I would likely to have a relatively good sounding instrument.

Shown above is a custom-made depth gauge I constructed for this project, featuring a pair of digital vernier calipers. The supporting frame and all the components were lasercut to ensure precision. This device allowed me to measure the thickness of the top and back plate at any point to an accuracy of 0.01mm.

The top plate of a bowed string instrument is made of spruce - a soft wood. The original top plate was 1mm too thick in most areas - that's quite a bit of wood to take off!
Unfortunately, I am not the most patient of souls. The end product was too thin, especially at the areas that were supposed to experience the most pressure when the entire instrument was put together (the middle)!

The back plate of the instrument is made of maple, which is a hard wood. Wood removal in this case was much harder than that of the front plate. Consequently, I measured the thickness more often and did not overshoot by much this time round. I even left some areas a bit thicker as I was too lazy to scrape off the remaining 0.2mm!
Note that the wood scrapings you see in the picture is probably a third of what I actually worked off the instrument!
3. Repairing the Damage:
Remember about the crack I made when removing the top plate? Not to mention the top plate itself being too thin! All this needed to be resolved before I put the instrument back together.
I managed to get some hide glue, varnish, a spruce dowl and some advice from the luthier and boss of Music Essentials, Mr. Chia Sin Teck.

Shown above in the ziplock bag is some hide glue; you have to mix the granules with hot water (about 75 degrees) in the right concentration. Upon application, you have about 2 minutes of working time before the glue cools and gels - at which point the glue joint (called a cold joint) formed is weak and useless.
I glued the crack together relatively easily. However, the hard part is reinforcement. Cracks on a string instrument are traditionally reinforced by gluing small pieces of spruce (called cleats) along the crack line and smoothing them down. The cleats must fit the contour of the area around the crack and be small enough not to affect the sound of the instrument.
However, cutting the cleats out of the spruce dowl i was given was a rather impossible task for someone like me - no training, no proper tools, no patience. The small cleats kept on breaking as i tried to saw them off the dowel with a penknife.
The solution to by dilemma came in the form of maple veneer. I got a nice big roll of it (1" x 8") for $12 from Ban Heng Leong Trading. Veneer is by virtue flexible and thin and maple is a hard tonewood. This fulfilled my requirements of having something light and strong that fit the contours of the instrument easily.

Shown above is the big roll maple veneer; I cut a small semicircle out and patched the crack with it. I then cut two larger circles and used it to reinforce the middle of the instrument (one on top of the other). I used makeshift sandbags (aquarium gravel in a ziplock bag) and a book to weigh down and press the veneer onto the instrument as the hide glue dried over the course of a day.

Lutheirs would usually put their label on instruments they make. No exceptions here :)
4. Putting it Back Together:
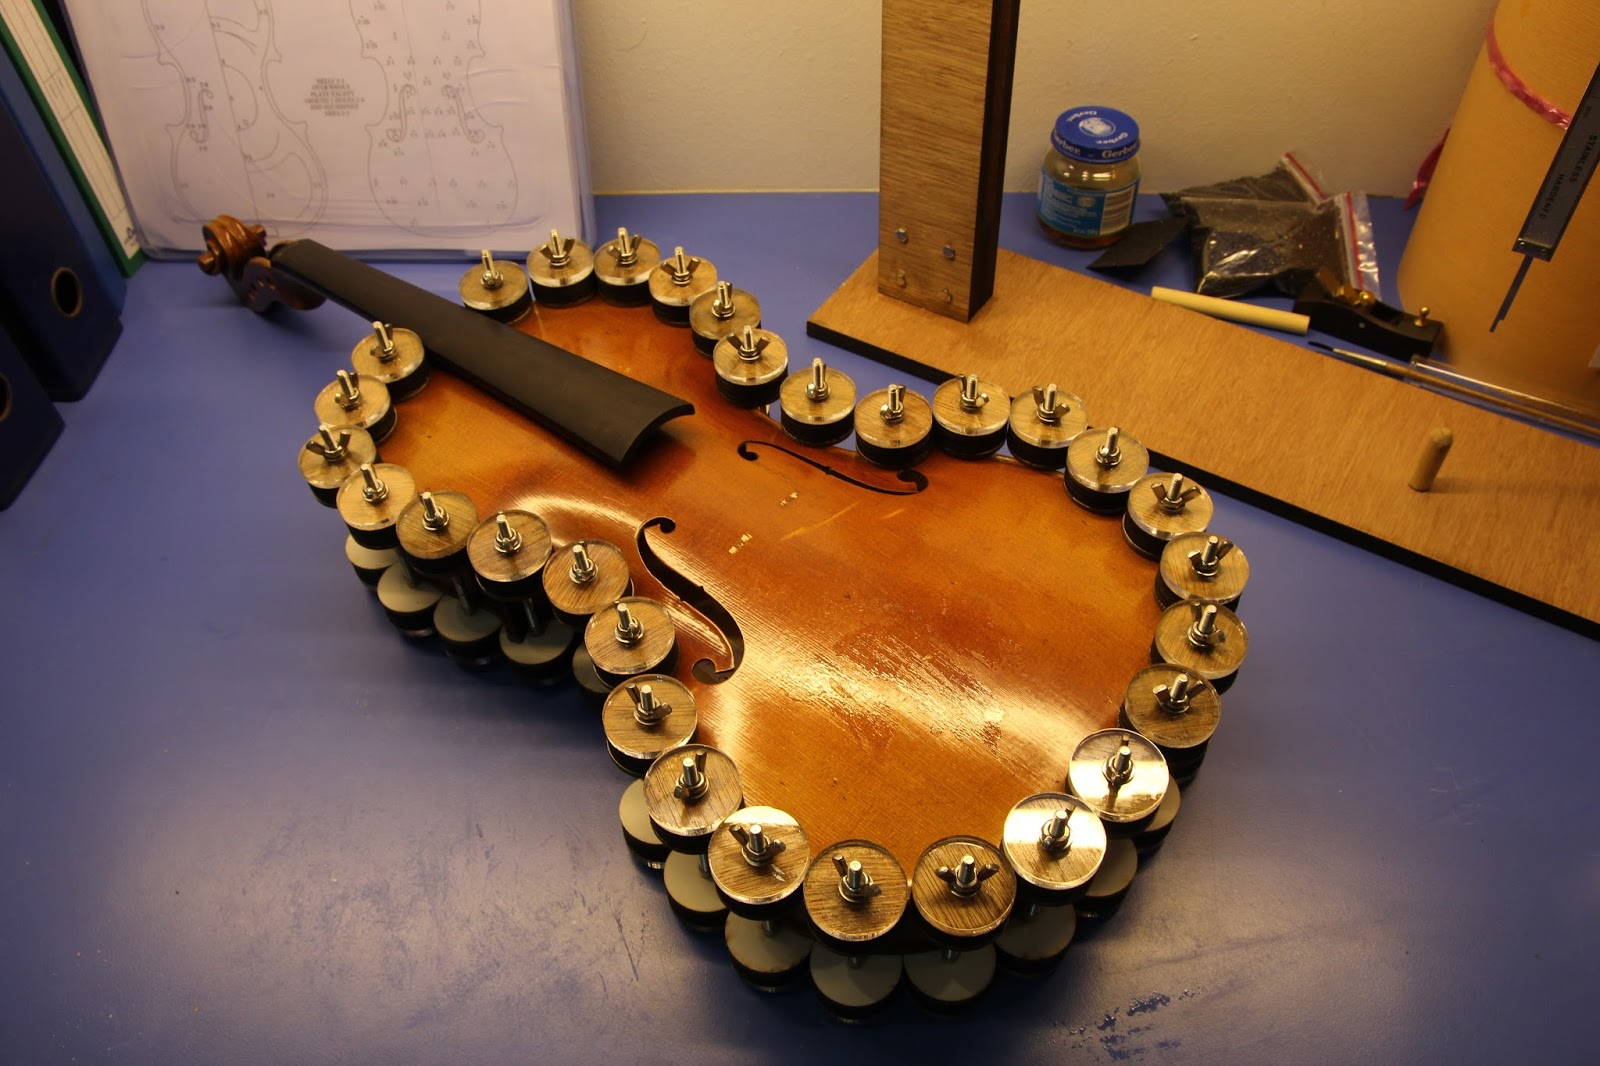
Some people consider step this quite hard as you only have two minutes to spread the glue along the ribs, get the top plate on right (alignment wise) and clamp the corners of the instrument down tight. I rehearsed the individual steps in my mind a few times in the period leading up to this event to be sure I would do it precisely and efficiently.
The clamps used here are called spool clamps. As usual, all the clamps (30 of them) were designed and made by me specially for this project. And if you all are wondering how I got so many nice circles, yes, I did make good use of the lasercutter at school.
5. Setting the Instrument up and Final Repairs
Now my viola was back together again, it was time to set it up and put the strings on!

A soundpost is a wood dowel that is inserted into the instrument somewhere near the middle. It serves to transmit the force and the vibrations the strings exert on the top plate (via the bridge) to the bottom plate so that the instrument resonates as a whole.
I used a drill and sandpaper to thin the remainder of the spruce dowel given to me (that dowel was meant to be a cello soundpost. It was a crude method but it worked somewhat.

One final repair - I apparently shaved off a bit too much wood on one side of the top plate, which resulted in a big gap between a portion of the plate and the ribs. This was fixed with thin rectangles of maple veneer inserted and glued carefully into the gap.
5. The Final Instrument:
After I set the instrument up, I took the finished product to Mr. Chia for a little tweaking (I really need to thank him; his help and guidance was genuine despite his busy schedule; I learnt quite a bit!) . He mentioned that I could further improve the instrument by increasing the projection of the fingerboard and changing the bridge accordingly, but enough is enough. I consider myself remarkably lucky to have gotten this far without having caused any irreparable damage to the instrument!


