Saturday 15 February 2014

Cardboard Box-On-Wheels

Refuse, Reduce, Reuse, Recycle – four things that most architecture students subscribe to, but find very hard to put to practice in the architecture studio.


This box-on-wheels was a personal experiment to see how far one could push the term 'reuse' in the context of the studio. Most of our models are built using cardboard parts that are precision cut by a laser. However, weird geometries combined with time pressure limit how much cardboard we can save by arranging the parts efficiently.


Inspired by the use of cardboard as structural element in product design (furniture, bicycles), I came up with the idea of laminating/gluing multiple sheets of scrap, lasercut cardboard sheets together to form a relatively strong board which could be reused. In addition, I also believed that the interesting shapes and uniqueness of each board would lend an aesthetic touch to the final product.


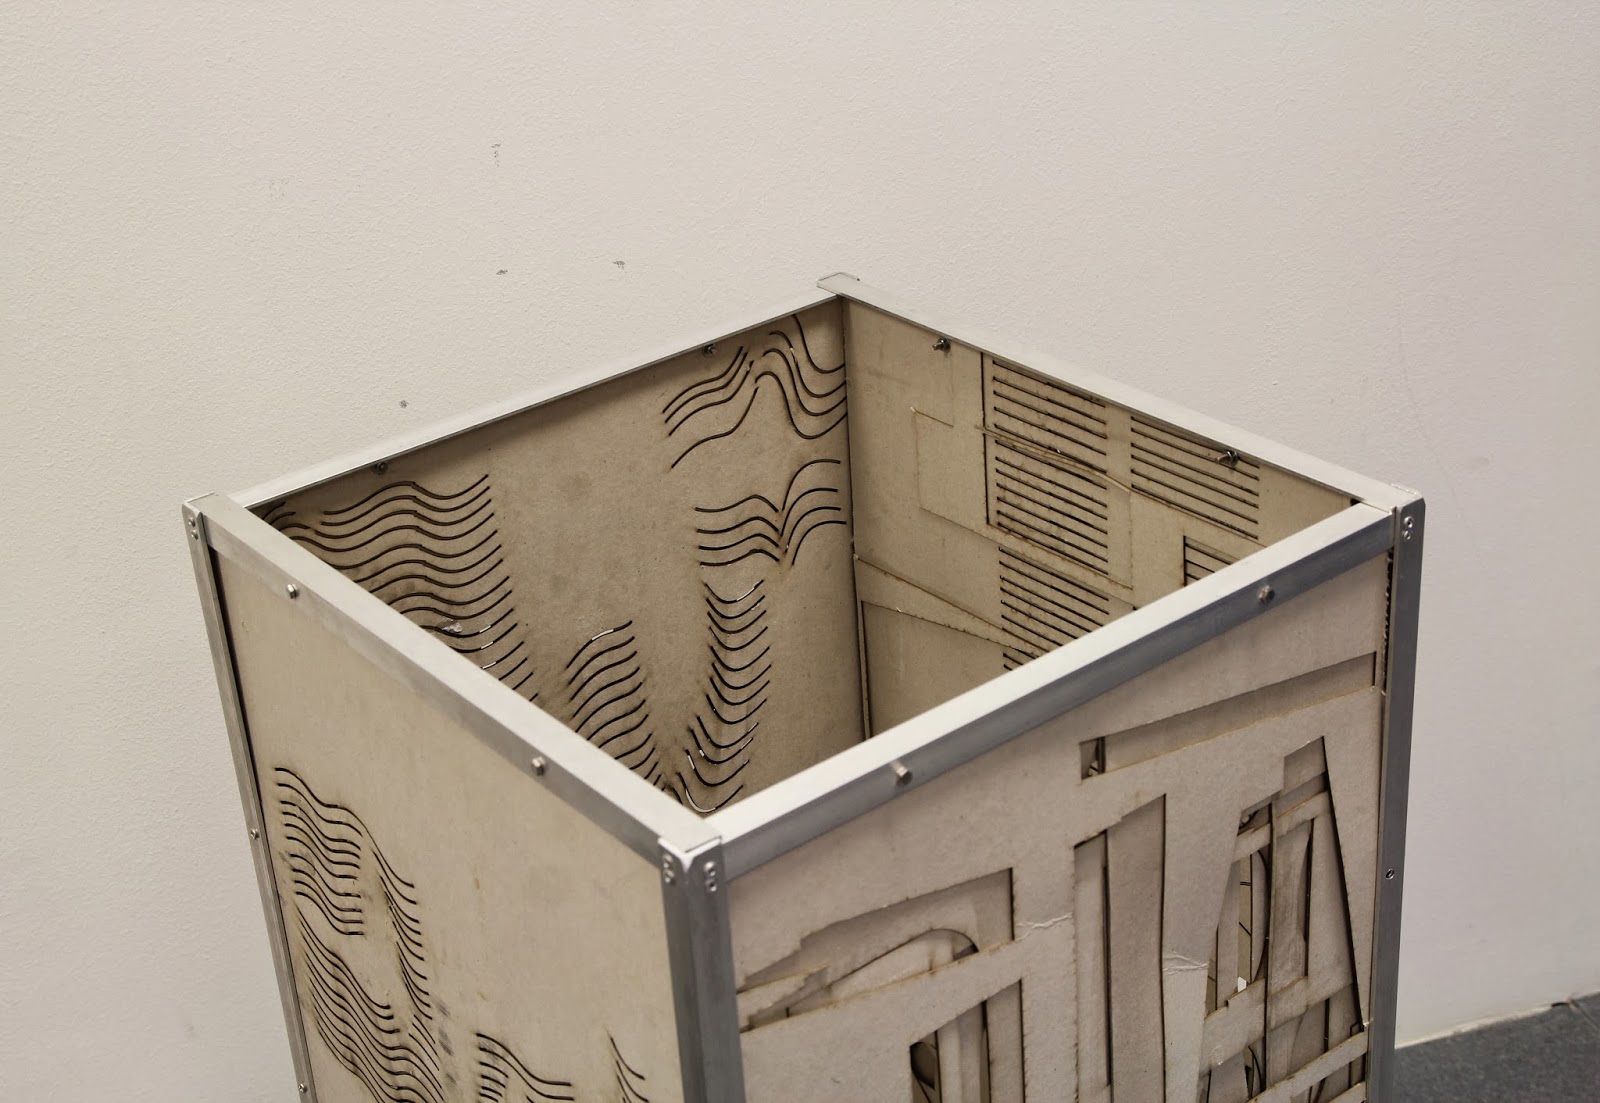
The box would comprise of an aluminum frame with wheels and the sides and bottom of the box would be made out of up to 8 layers of laminated scrap cardboard. Scrap cardboard was plentiful in the studio and I chose pieces that still had a relatively large amount of cardboard on them. The boards with more interesting designs were earmarked to form the front and back of the laminated board. Gluing the boards was a messy business that drew the curiosity of my studio mates!


The final product was rather heavy. The laminated cardboard turned out to be relatively solid as a material, and I believe that the back and sides will hold up to anything that is not too heavy (3kg on each side, 40kg spread out on the bottom, which has bracing). As of now, the box would be used as a protective container to store my architecture posters!


Thursday 13 February 2014

Cello Repair 11/2013


This cello belongs to a friend who played it in his school's Chinese Orchestra when he was younger. It had survived what I believe was a relatively major fall that saw the fingerboard take the brunt of the impact.


Fortunately, most of the force of the fall was used to break the glue holding the fingerboard to the neck, resulting in the fingerboard breaking off and taking a small chunk of the neck it it. For those who don't know, violins are held together by hide/animal glue, which is designed to give way in some situations before the wood cracks.


Other than having a small chunk of its neck torn off, the instrument suffered no other forms of structural damage Gluing the fingerboard back on is (and was) a messy and frustrating business as it tends to slip and slide, smearing glue all over the place (in any case, dried hide glue is easily washed off with hot water).


One other complaint my friend gave me was that he did not like the sound of his instrument (before the fall)! Besides new strings (which the instrument was in dire need of), I noticed that his bridge was also thicker than normal. Violin shops sometimes leave the bridge (and the entire violin for that matter) a bit thicker than recommended on student instruments to negate the lower quality of the wood used as well as to allow the instrument to better survive repeated abuse.

However, a thick bridge muffles the sound of an instrument as it cannot efficiently transfer string vibrations to the body of the instrument. On the flip side of the coin, an overly thin bridge also does detriment to the tone of the instrument and will also warp with time (due to pressure from the strings).


Thinning the bridge (I used a belt sander) tested my patience as bridge thickness is measured to an accuracy of 0.1mm (using digital calipers) and it is very easy to over-thin the bridge. Overall, I had to thin the thickest parts of the bridge by around 1.2mm and the thinner parts by as little as 0.3mm. The results were quite satisfactory as constant checking ensured that I did not shave off too much (a lesson learnt from carving a violin bridge for the first time).


Putting everything back together, the cello spoke again after many years in storage. A final verdict on the tone (normal student grade tone, rounded, slightly bright, a little thin) however, will have to wait for new strings!

Violin Repair 11/2013

This is a Suzuki (Japanese) violin that belonged to my friend's grandfather. It came in the condition that any old instrument will have come in – in need of repair!

Overall, the instrument had suffered no real structural damage. However, its seams were very loose in many places as the glue had dried out and cracked over the years. In addition, the previous owner had attempted his own repairs by gluing some of the then-loose seams shut with gum! The violin had lost its bridge and had to have its fittings and strings changed/reworked.


All seams that were not held together with gum were broken and glued shut. One point to note is that gum used was effective to the point where it was impossible to remove from the instrument! Not the proper way to repair an instrument (you can't open the instrument after that without damaging it) but functional nonetheless.


A new bridge was carved; this is the first time I have ever done this or any other fine wood carving so I selected a $16 Aubert Mirecourt bridge (second lowest grade, from France) The bridge comes with its rough shape and detail already in. A violin maker will then thin the bridge to specifications, fit the bridge feet to the curved body of the instrument and further carve out the details on the bridge. This is all very skilled work as the maple bridge will crack/break if too much force is applied at the wrong points.


All in all, luck was with me most of the way. The bridge I made was overly thin in some places due to my overzealous and impatient sanding (which will lead to it warping with time and affect the tone of the instrument). However, I was able to do everything else without damaging the bridge or cutting myself (I used a very sharp carving knife). The only other complaint about the bridge was that the angle between the A and E string was too shallow, making it easy to accidentally hit one when playing the other.


Other than that, the tuning pegs were trimmed as the ends were sticking out. One peg turned out particularly loose. A new soundpost was carved and fitted in. A new tailpiece, chinrest and strings were then installed and the instrument was given a wipe down.


The tonal quality of the restored instrument was bright. It carried a modicum of projecting power but sounded somewhat thin, possibly due to the thin bridge. I believe that adjustments to the soundpost (which was a hair too long on hindsight) and bridge position would produce a perceivable improvement to the sound of the instrument in both tone and projecting power.


35mm Film Holder

There are a few ways to digitize film negatives. You could scan them in (takes very long), scan the photos they produce in (a bit faster) or you could use a DSLR to take pictures of the negatives. The last method is relatively quick, but requires moderate photo editing skills to correct the colors of the negatives.


It also requires a 35mm film holder. There are some commercial models that attach to camera lenses but its easy to build your own as shown here. This guy was made out of (lasercut) clear acrylic painted over with acrylic paint. It holds a strip of negatives steady and frames a single 35mm negative for capture.

Cello Stopper

This was a rather old project; I found a nice sheet of clear acrylic lying around and decided to make cello stoppers with it.


There are two types of cello stoppers available in the market; one relies on friction to keep the cello from sliding away from the user during use and the other utilizes a strap with a metal/wooden ring at the end at secure the stopper to the chair the cellist is using. However, both come with disadvantages: one needs to be cleaned regularly to maintain its ability to grip the floor and the other limits the types of chair the cellist can use as the chair leg must be able to fit into the ring at the end.


This cello stopper overcomes both disadvantages as it uses a nylon strap to secure it to the cellist's chair, negating the need to find a chair with slim legs.


Materials and Methods:

Clear Acrylic 10mm – Scrap Material – Lasercut


Nylon Straps and Adjuster – Beach Road Army Market – Sewn and Melted at the Ends.